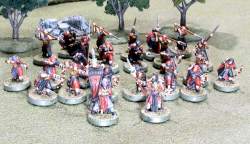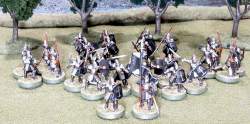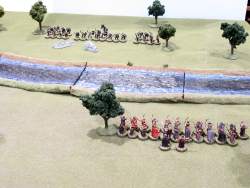


This scenario for Games Workshop's "Lord of the Rings" miniatures game comes from the Pelennor Fields supplement. In it, a squad of Haradrim face off against a squad of Gondorians, each with a captain and a banner bearer. So it's a pretty straightforward battle, with some additional interest provided by the victory conditions; each side gets a point for every casualty caused, plus Harad gets a bonus point for every figure on the north bank of the river Harnen at the end of turn 12. But if Gondor can keep all the Haradrim south of the river at that point, they get a ten-point bonus.
Casualties return to play on the next turn from the friendly board edge. This means that Haradrim spearmen killed after turn 8 are effectively eliminated from the game, as they don't have enough time to cross the river before the game ends. (Haradrim bowmen can, of course, continue to attempt to inflict casualties with arrows.)
None of this represents any specific scene in the books or the movie. Ordinarily I prefer to stick to historical (as it were) scenarios, but this one seems innocuous enough, as there must have been many clashes like this between Gondor and the Southrons over the course of the Third Age. Plus, it gives me a chance to put my new Haradrim and as-yet unused Gondorians into action.
(Click on any image to see an enlargement.)
The Haradrim force is a Chieftain, a Banner Bearer, 12 bowmen, and 11 spearmen. The Gondorians have a Captain, a Banner Bearer, 8 bowmen, 8 swordsmen with shields, and 7 spearmen.
It may seem that the Haradrim are superior in archery, but the Gondorians are twice as hard to wound, due to their armor. So on average per turn we should see 6 Haradrim hits, one of which actually kills, compared to 4 Gondorian hits with one and a third kills.
The Gondorians deploy first, and with no idea how the enemy will set up, use a balanced formation, with the Captain and Banner Bearer somewhat protected by the line troops.
The Haradrim set up on Gondor's left flank, with the idea of pulling the Gondorians toward the board edge, and then re-entering casualties near the other edge, forcing the Gondorians to split to meet the multiple threats.
As always, Good automatically gets Priority on turn 1. The Good troops shift to their left to deal with the main crossing, the bowmen lagging a bit so that they can fire. The Haradrim make a half-move to the river for similar reasons.
The Shoot Phase shows why statistics are only a guide to what will probably happen, as the Gondorians fail to inflict any casualties at all, while the Haradrim arrows find gaps in the armor of two swordsmen.
Casualties: Good 2, Evil 0
Evil Priority. Both sides continue their movements, with last turn's Good casualties off in the background.
The Shoot Phase again defies the odds, as while Harad gets the expected one kill, six of the eight Gondorian bowmen hit their marks, and yet all of them fail to kill their targets!
Evidently the Southrons availed themselves of some pretty heavy anti-arrow magic.
Casualties: Good 3, Evil 0
Good Priority. Gondor nearly has the river bank covered, so Harad takes the half move and continues the shooting. After all, it's been working so far.
Good finally kills two spearmen, while Harad takes down another swordsman.
Casualties: Good 4, Evil 2
Good Priority on an uneventful turn that has no casualties at all. Last turn's Haradrim casualties enter on the opposite edge of the battlefield from the main action, hoping to draw away some enemy men.
Next turn is bound to be bloody though, as the Haradrim will be on the north bank of the river. Can the Gondorians clear them out?
Casualties: Good 4, Evil 2
Evil Priority as the melee begins. Gondor finally inflicts more casualties than she suffers in losses.
Casualties: Good 7, Evil 7
Good Priority. The swirling melee continues, with Gondor focusing on the Haradrim Chieftain, on the banks of the river. The combat roll is in Good's favor, 6-4, but the Chieftain has two points of Might. Should he use them to win the battle? If he doesn't there's a small chance that he'd be wounded to death this turn. In the end I decided that on a roll of 1 or 2 he would use both Might points, and I rolled a '2'. Because of his higher Fight value, the Chieftain then wins the tied combat, and together with some other Haradrim victories, Evil again pulls ahead in the point count.
Casualties: Good 11, Evil 10
Evil Priority. The Chieftain rushes the Gondor Banner Bearer and even kills him, but an adjacent spearman picks up the banner. Elsewhere Good knocks off two more Haradrim and the score is again even.
Casualties: Good 12, Evil 12
Evil Priority again. The Gondor Captain calls for a Heroic move, which enables most of the troops in the east to engage an enemy of their choice, while doubling up on the Chieftain and Banner Bearer. The Chieftain is wounded and the Banner Bearer killed, but again an adjacent spearman picks up the fallen banner. And that's about it for Good kills this turn. On the far right, two Haradrim are each outnumbered 2:1 by foes but win their combat anyway and even kill one opponent. Two other Gondorians fall in the center.
Casualties: Good 15, Evil 13
Good Priority. As if to make up for last turn, luck now entirely favors Gondor. Gondorian arrows, which haven't done anything in a number of turns, pick off a Haradrim warrior crossing the river. The Chieftain is surrounded and despite six strikes only one Wound is scored, but the Chieftain fails his Fate roll and down he goes.
Evil fails to inflict any casualties at all, though at least a few more troops are across the river or nearly there.
Casualties: Good 15, Evil 17
Evil Priority. The Good Captain again calls a Heroic move so as to engage the Haradrim on the eastern flank on their own terms. In particular, the Banner Bearer must die.
Gondorian bows inflict two casualties. The Southrons win more than their fair share of combats, but fail to inflict any wounds. But Gondor wins the crucial melee with Banner Bearer and down he goes, this time with no Haradrim warriors adjacent to pick up the banner. One other Haradrim dies in melee.
With two turns to go, things are looking grim for Evil.
Casualties: Good 15, Evil 21
Good Priority. Now heavily outnumbering Harad on the eastern flank, Good moves to surround the remaining units. Evil arrows continue to bounce off armor, while between bows and combat Gondor manages to inflict seven casualties, virtually clearing their left flank of potential Haradrim scoring troops.
Evil again fails to inflict any casualties.
Casualties: Good 15, Evil 28
Good Priority. Just to show the swings of luck possible, this turn all eight Gondorian bowmen miss entirely (yep, eight consecutive hit rolls of 1-3). The Haradrim bowmen manage 3 kills in return.
But it's not enough. Symbolically, the easternmost Haradrim that has been fighting outnumbered and yet still holding out since turn 6 finally succumbs, as the only casualty inflicted by Good this turn.
But it's not enough. Gondor scores the 10 point bonus for clearing the northern bank of the Harnen.
Casualties: Good 18, Evil 29
Final Score: Good 39, Evil 18
Well, that wasn't particularly close.
However, it wasn't until I began this write up that I remembered the poisoned weapons of the Haradrim. This allows them to reroll any Wound die of 1. I don't keep detailed enough records to know exactly how much effect this rule would have had on this game, but it's hard to imagine it making enough of a difference given the huge margin of victory.
As Evil, I also hurt my chances by focusing too much on shooting. It's imperative to get troops across the river so that someone -- anyone! -- survives on turn 12 to prevent the Gondor scoring bonus. So moving reinforcements at half moves so that they can take potshots probably contributed to the lopsidedness of the Good victory.
Losing all the Evil Hero's might in one fell swoop hurt, too. I maybe should have taken my chances that he'd survive the combat.
A final thought on balance is the width of the river. This counts as difficult terrain, doubling the cost to move through it. My river appears to be as wide as called for by the scenario, but in practice this width really hurts the Haradrim. Any Haradrim spearmen killed after turn 7 becomes irrelevant because even though he can re-enter the game, he can't get across the river by turn 12. I might impose the difficult terrain penalty only on the deepest part of the river next time.
Worth a replay, I think. But it's odd that Gondor's scoring and defense advantage is not countered by giving the Haradrim more troops.