

This Lord of the Rings Strategy Battle Game scenario is from the Two Towers Journeybook. Treebeard and three Ents attack Isengard to put a stop to Saruman's nefarious machinations.
(Click on any image to see an enlargement.)
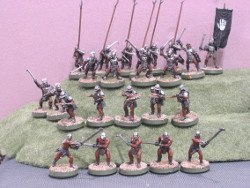
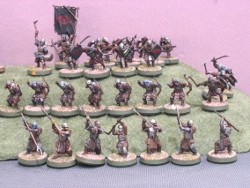
The Evil forces have both Uruk-hai and regular Orc contingents (Pictures 1 and 2). If you look closely near the bannermen you can see that each contingent has a model with golden triangles painted on the base; those mark a Captain. The scenario as written lists an Isengard Troll and Feral Uruk-hai among the Evil troops, but I'm not a fan of Games Workshop's made-up stuff so I substituted an equal points values worth of various types of warriors.
The Evil force is effectively almost twice as large as seen here, because each warrior that is killed has a 50% of re-entering the game as a reinforcement. The scenario doesn't specify where they should appear, so I ruled that they could appear at any scaffold.
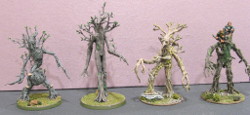
The Good forces are (Picture 3, left to right) a Linden Ent, a Generic Ent, a Birch Ent, and Treebeard. Merry and Pippin are riding Treebeard and will contribute some low-quality shooting during the game. The Linden and Birch Ents are lovely, characterful models from Shadow and Flame. Unfortunately, at the time of this writing they appear to be out of stock. The Generic Ent -- let's call him Quickbeam -- is Games Workshop's plastic model kit and looks positively cartoony in comparison. Treebeard is a fine effort, though; my only complaint is that he looks a bit short compared to the others.
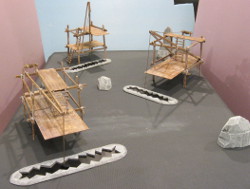
The board (Picture 4) has three scaffold's supporting Saruman's manufacturing operations on a 2' x 4' board. If the Ents can destroy all three without losing Treebeard, they win.
My table is actually a little smaller than 4', so the Ents are going to start closer than they should be to the scaffolds. To make up for that discrepancy, I set them up as far from the closest scaffold as I could get.
Since Evil is supposed to set up in three groups around the scaffolding, I divided each troop type into three and randomly rolled for the location of the remainder. I then put the Orcs on the scaffolding to represent the workers, then distributed the Uruks around the scaffolding to act as guards.
Good Priority
As always, Good starts a scenario with Priority.
The Ents advance but stay out of immediate charge range next turn. Evil bowmen stay put so that they can shoot, while the other troops move towards the Ents. Orcs near the stairs use them so as to descend safely, but Orcs that are too far from the stairs jump down. That mostly works to Evil's advantage, but two unfortunates muff their Jump rolls and then die from the falling damage. You can see them to the right of the nearest scaffold, just behind the crevice.
Evil begins the game with a lucky Wound from a crossbow on Treebeard. He expends 2 Fate points to negate it.
Evil Priority, 6-5
Evil charges where he can (Picture 1). There are not many models in range, but there are enough to prevent the Ents from making forward progress. Only one potential charger finds the Ents terrifying enough to fail his Courage test. One of the two dead models from last turn reappears.
Shooting sees only one casualty, the Uruk-hai facing the Birch Ent (Picture 2) In some ways, this is actually a good thing for Evil, as it denies the Good player a chance to use any of the Ents' Brutal Power attacks, which, as we are about to see, can be an effective force multiplier.
Quickbeam wins his combat and decides to use the "Hurl" Brutal Power attack again his opponent (Picture 3). He rolls high, knocks over two other enemies and kills the Berserker in the process.
Treebeard likewise wins and likewise Hurls, taking out two warriors and knocking down a few others (Picture 4).
The Linden Ent also wins and Hurls, throwing his opponent through the Uruk Hai Captain but failing to inflict any wounds (Picture 5).
Evil Priority, 6-3.
Evil Charges where he can and moves up to the battle line where he can't. The prone Uruk-hai Captain would like to charge the Linden Ent, but muffs his Courage roll and must stay put. The Orc Captain likewise fails his Courage test, and the higher ranks wait to see what their underlings can accomplish on their own (Picture 1). None of the four dead warriors from last turn return to play.
Shooting sees Evil scoring another wound, but this time the victim is the Birch Ent. One wound down, eleven to go....
Quickbeam wins his combat (Picture 2) and then Barges. He gets a good roll and is able to engage two Uruks, including a crossbowman. He wins, kills them both, and has cleared out the Ents' left flank (Picture 3).
Treebeard wins his combat, too, despite rolling a lousy 4 highest. He hurls the Berserker 9" and kills a couple of passed-through models (Picture 4). Though the Berserker survives, he's going to be out of combat range for a couple of turns.
The Linden Ent also wins and also hurls, but the rolls a disappointing 1 for the distance and the only damage done is to a couple of Evil models' pride (Picture 5).
Evil's luck continues to improve, as though the Birch Ent beats his Orc attacker, and, sensing an opportunity, arges into the prone Uruk-hai Captain. But he rolls just 1,2,3 on his combat dice; the prone Captain answers with an even worse 1 & 2, but, fearing the consequences of defeat, he expends his two Might points to win the battle. Though he gets no strikes, he stands up and shouts his defiance at his enemy. (Picture 6).
Evil Priority, 2-1.
Evil charges again (Picture 1). It's pretty obvious strategy: if the Ents can't move, they can't attack the scaffolds, and eventually they will lose combats and take wounds, while any dead Evil warriors combat back 50% of the time. This turn they do even better and two of the three dead from last turn reappear. There are now 6 warriors in Evil's permanently dead pile.
On the Ents' left, the unengaged Quickbeam must decide whether to move to help his compatriots or to take advantage of relative absence of Evil forces to get closer to the scaffolding. The latter seems to make more sense and off the hasty Ent goes (Picture 2).
Shooting is completely ineffective this turn.
Treebeard wins his combat and has a particularly effective Hurl, killing a bunch (prone models pointing left) and knocking over others (prone models pointing right) (Picture 3).
The Linden and Birch Ents lose their combats, however (6-5 and 5-4, so close...) and each takes a wound. The Birch Ent now has only one wound remaining!
Good Priority, 5-5.
It's now the Ents' turn to charge and try to make some progress towards the scaffolds. Evil then piles in where he can and continues to bring up troops from the far scaffold (Picture 1). Two of last turn's casualties return; there are now 8 permanently dead Evil models.
Shooting sees the Birch Ent taking another Orc arrow, making three wounds and a dead Ent. Bad news for the Good player!
Quickbeam is surrounded (Picture 2) but luckily wins his combat 6-5. While killing Orcs is always fun, the scaffolds are the true goal and so he aims his strikes there. His three attacks are doubled by special rule against the scaffolds, and he rolls an awesome 2,5,6,6,6,6 to land five hits of the six needed to destroy it. (Picture 3, black poker chips marking the damage).
On the other side of the board, Treebeard wins his combat and outright kills two enemies, while the Linden Ent loses and takes another wound, now having just one remaining.
Good Priority, 4-2.
Liking the taste of scaffold, Quickbeam moves in contact with it while simultaneously pinning a crossbowman (Picture 1).
Treebeard and the Linden Ent move to engage the closest Uruks while covering each other's flank (Picture 2). Evil charges, a detachment in the rear heading towards the rampaging Quickbeam and both warriors killed last turn reappearing.
Shooting is ineffective this turn.
Quickbeam easily wins his combat. He uses one strike against the scaffold and down it goes (Picture 3)! An Orc underneath the structure and the two bowmen on top of it are killed in the collapse. Quickbeam's other strikes take out the crossbowman.
Against the Linden Ent, Evil rolls a 4 highest but the Orc Captain is in this fight and he still has two Might points. The Ent gets the 6, though, so there's little point in expending the Might yet, and he Hurls the Captain 8", taking out an Uruk and an Orc and putting two wounds on the Captain, who is kept alive only by his Fate point.
Evil rolls a 5 highest against Treebeard, who underperforms, getting only a 4 highest. So he expends his first Might point to cause a tied roll, because he wins on higher Fight value. He, too, hurls the Uruk Captain 8", but he kills just a single model.
All in all a pretty satisfying turn for Good. Seven Evil models were killed this turn, the Captains are hurting, and one of the three scaffolds is down. Still, it's a loooong way to the other two scaffolds.
Good Priority, 6-2.
Quickbeam considers moving backward to get Hurling ammunition, but remembers that the scaffolds are the goal. So instead he advances, moving past the rubble and out of charge range of his former attackers.
Treebeard and the Linden Ent, fearful of being surrounded, back up a bit to engage the models on their flanks. Good is hoping for lots of failed Courage tests, and many do fail, particularly against Quickbeam (Picture 1). Four of the seven models eliminated last turn reappear.
Shooting takes out one of Quickbeam's attackers. The honors are about even here, with the shooters inflicting wounds on both sides about equally. But there are always more Evil troops, whereas the Good models, down 25% with the loss of the Birch Ent, are looking thin on the ground.
Quickbeam wins his combat and debates whether to Hurl or Barge. He ends up Hurling, hoping for casualties, but though he kills the thrown model, neither of the two models knocked prone are wounded (Picture 2).
The Linden Ent wins and Hurls, too, trying to hit the Orc Captain but his Hurl roll is a miserable 1, and the resulting 5" distance isn't enough, though the hurlee is killed.
Treebeard faces an Evil 6 highest but comes through himself with a 6 to win. He also elects to Hurl, also rolls a 1, though he's closer to the Captain and just manages to hit him. But again only the "projectile" is killed (Picture 3).
There are now eleven models in Evil's dead pile.
Good Priority, 4-2.
Quickbeam moves to attack the prone bannerman. Treebeard and the Linden Ent consolidate.
Evil charges, with almost all Courage tests passing and all four dead models from last turn reappearing.
Merry and Pippin have been plinking away without effect this entire game, but at least Pippin lands a hit and kills an Orc. The crossbowmen decide to join in the fun of shooting Evil models and take out two of Quickbeam's attackers. Oops!
Quickbeam ends up facing just one Orc, but that Orc gets a 6 and Quickbeam can manage only a 5. Quickbeam's hide proves too tough for his enemy (Picture 1).
The Linden Ent is a repeat of Quickbeam, Good's high 5 losing to a 6 but no wounding.
Treebeard likewise faces a 6, but manages to roll a 6 himself and wins on Fight value. He barges left and flattens a Berserker on his flank.
There were only 4 Evil models killed this turn, and two were own goals by the Evil side. Not a great turn for the Ents.
Evil Priority, 4-2.
Evil charges, but has a tragic number of Courage Test failures. Only one warrior manages to get to Treebeard. That's a brave Uruk-hai! Three of four eligible dead warriors come back.
Merry evens the Shooting tally by downing an Orc. The Evil crossbowmen are particularly lethal this turn, wounding Quickbeam but at the cost of two warriors attacking him and also wounding the Uruk-hai Captain.
Quickbeam loses his combat (only a 4 highest) on takes another wound (Picture 1).
Treebeard loses his combat 5-6, but he's got a Might point to spend to claim the victory anyway. He Hurls his brave opponent 8" away and kills three models in doing so.
The Linden Ent also loses his combat 5-6, but with no Might he must endure the strikes. An Orc swordsman gets the lucky 6/4 combo and down the Linden Ent goes (Picture 3)!
Evil lost six models this turn, but that doesn't compensate for the loss of an Ent. The two remaining scaffolds are still as far away as ever.
Evil Priority, 4-2.
Evil charges again. Three dead models are revived. Shooting is ineffective except for an Orc bow taking out the guy trapping Treebeard (Picture 2).
Quickbeam's attackers get their 6 but so does Quickbeam, who uses his victory to Barge up to the Uruk-hai Captain and subsequently kill him (Picture 3).
Despite the impressive number of dice rolled against Treebeard, Evil gets only a 5 highest and Treebeard matches that. The Orc Captain uses a Might point, and Treebeard matches it to keep the win. Treebeard's strikes are lethal, taking out the Orc Captain and two other warriors (Picture 4). There is now no Might left in the game.
Evil Priority, 3-1.
Evil charges, but in the case of Quickbeam it doesn't matter because the crossbows put him away permanently. Treebeard gets his six in combat and decides to Barge -- hey, it would be nice to get at least one hit against the second scaffold -- but his movement roll is a disappointing 1", not even enough to re-engage his tormentors.
Evil Priority, 6-5.
Evil charges. Pippin kills an Orc and the crossbows claim another, but they also put a wound on Treebeard, whose last Fate point fails to negate it.
Treebeard flubs his combat roll with only a 4 highest, but Evil does no better. Both sides must be getting pretty tired at this point. Still, Treebeard does manage to kill two of his opponents.
Evil Priority, 5-2.
Evil charges, not without a great many failed Courage tests. But Evil's luck returns in the Shooting phase and Treebeard takes another wound. He's got only one remaining!
The combat dice are tied at 5, so Treebeard wins. He decides to Barge, and finally gets a 6 and so can move a significant distance. He engages an Orc with a two-handed weapon and a Berserker, who also has a two-handed weapon. Since two-handed weapons force a -1 on the fight die, this seems like a pretty good bet, but Treebeard manages only a 3 highest and the Evil models get a 5. They roll for Wounds, the Berserker gets a 6, and Treebeard goes down. Game over!
That didn't seem very balanced, but it was a lot of fun. The two sides play very differently, with plenty of opportunity for those oh-so-fun Brutal Power attacks, and it looks really cool.
I won't claim my Ent tactics were optimal. I think I'll rely on Barging more often in the future in hopes of being able to keep moving forward, and it may be worth sitting still for the first couple turns and just throwing rocks at the structures. But despite suboptimal tactics, I think Good has a real uphill battle here.
What's really perplexing is that this scenario came out well before the Brutal Power attacks in the Hobbit rulebook. When Evil could just throw in a single warrior to stop an Ent cold every turn, how would the Ents make any progress at all?
This scenario certainly seems worth giving another go sometime. I am mulling over some modifications, though:
Thoughts?