Above the Trenches
Design Essays
What?
Why?
Design Parameters
The Counters
Bloody April
How Bloody Is It, Anyway?
If you look at the dates of the essays, you'll see that Above the Trenches got back burnered. Instead, I developed two related projects, Wings for the Baron and an interactive map of WW1 aero squadrons.The former was supposed to be a quick-to-produce closeup look at the quest for better fighters. I think it succeeds in everything except the "quick" part -- development took much longer than I expected.
The latter is a storyboarding aide that took on a life of its own. Indeed even now it's not actually done, but it's far enough along that I can put it aside for a bit and return to Above the Trenches.
However, I think further sketching out the tactical system without reference to the historical situation is unlikely to be fruitful. So let's take a look at the most famous part of the air war, Bloody April. During spring of 1917, the Royal Flying Corps was called on to support the British Arras offensive. Still mostly equipped with obsolescent types, and facing an enemy armed with modern Albatros fighters, the RFC took a fearful beating.
Here's the situation on April 15th:
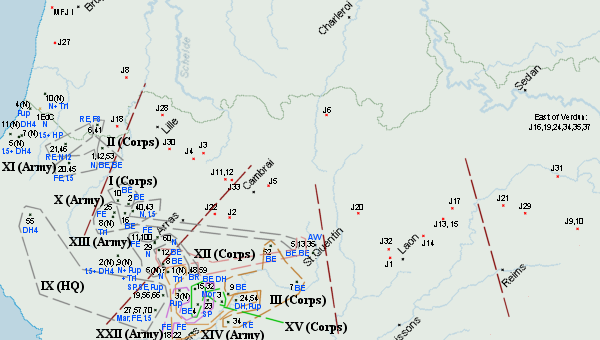
Things are a little hard to make out due to the poor resolution of computer screens, but it will do for our purposes. I added the British brigade commands to satisfy my own curiousity, as given the game scale it works out that each counter is about Wing sized.
I've added the squadron compositions in bright blue. Here's a guide to what they represent and how they are rated in Above the Trenches terms:
| Abbreviation | Name | Rating | Abbreviation | Name | Rating | |
| 1.5 | Sopwith 1½ Strutter | R0 | Mar | Martinsyde Scout | F1 | |
| AW | AW FK8 | R2 | Mor | Morane Parasol | F0 | |
| BE | BE 2 | R0 | N | Nieuport 17 | F2 | |
| BR | BR f2a | R3 | N 12 | Nieuport 12 | R0 | |
| DH4 | DH 4 | B0 | Pup | Sopwith Pup | F3 | |
| F8 | FE 8 | F1 | RE | RE 8 | R1 | |
| FE | FE 2 | R0 | SP | SPAD 7 | F3 | |
| HP | Handley Page O/100 | B1 | Tri | Sopwith Triplane | F3 |
I can't find exact details of what the Jastas were equipped with, but in general there were many Albatros D.IIs (F3), leavened with some slightly better Albatros D.IIIs (still F3) as well as some Halberstadt D.IIs (F2).
The red lines show the geographical divisions of the map; from left to right: Ypres, Arras, Somme, Aisne, and Champagne. Off map to the right are Verdun and Nancy.
Ypres sees four Jastas (one F3) versus a mixed collection of RFC, RNAS, and Belgian squadrons. II Corps wing has a N12 squadron, an RE squadron, and two BE squadrons for roughly an R0.
Dave Townsend (townsend@patriot.net)
01-Mar-2008